Venner 240V Hours Run Indicator

I was at the tip shop the other day and got a few things for $10 (junk) One of them was this, A Venner Hours Run Indicator. It has a nice solid housing and I thought I might be able to use it in a project some place. When I should of been cleaning the shed I decided to tear it down and see what could be done. Its operation seems to be all in its name. When power is applied it ticks over the timer which I guess is in hours.


20140810_211550

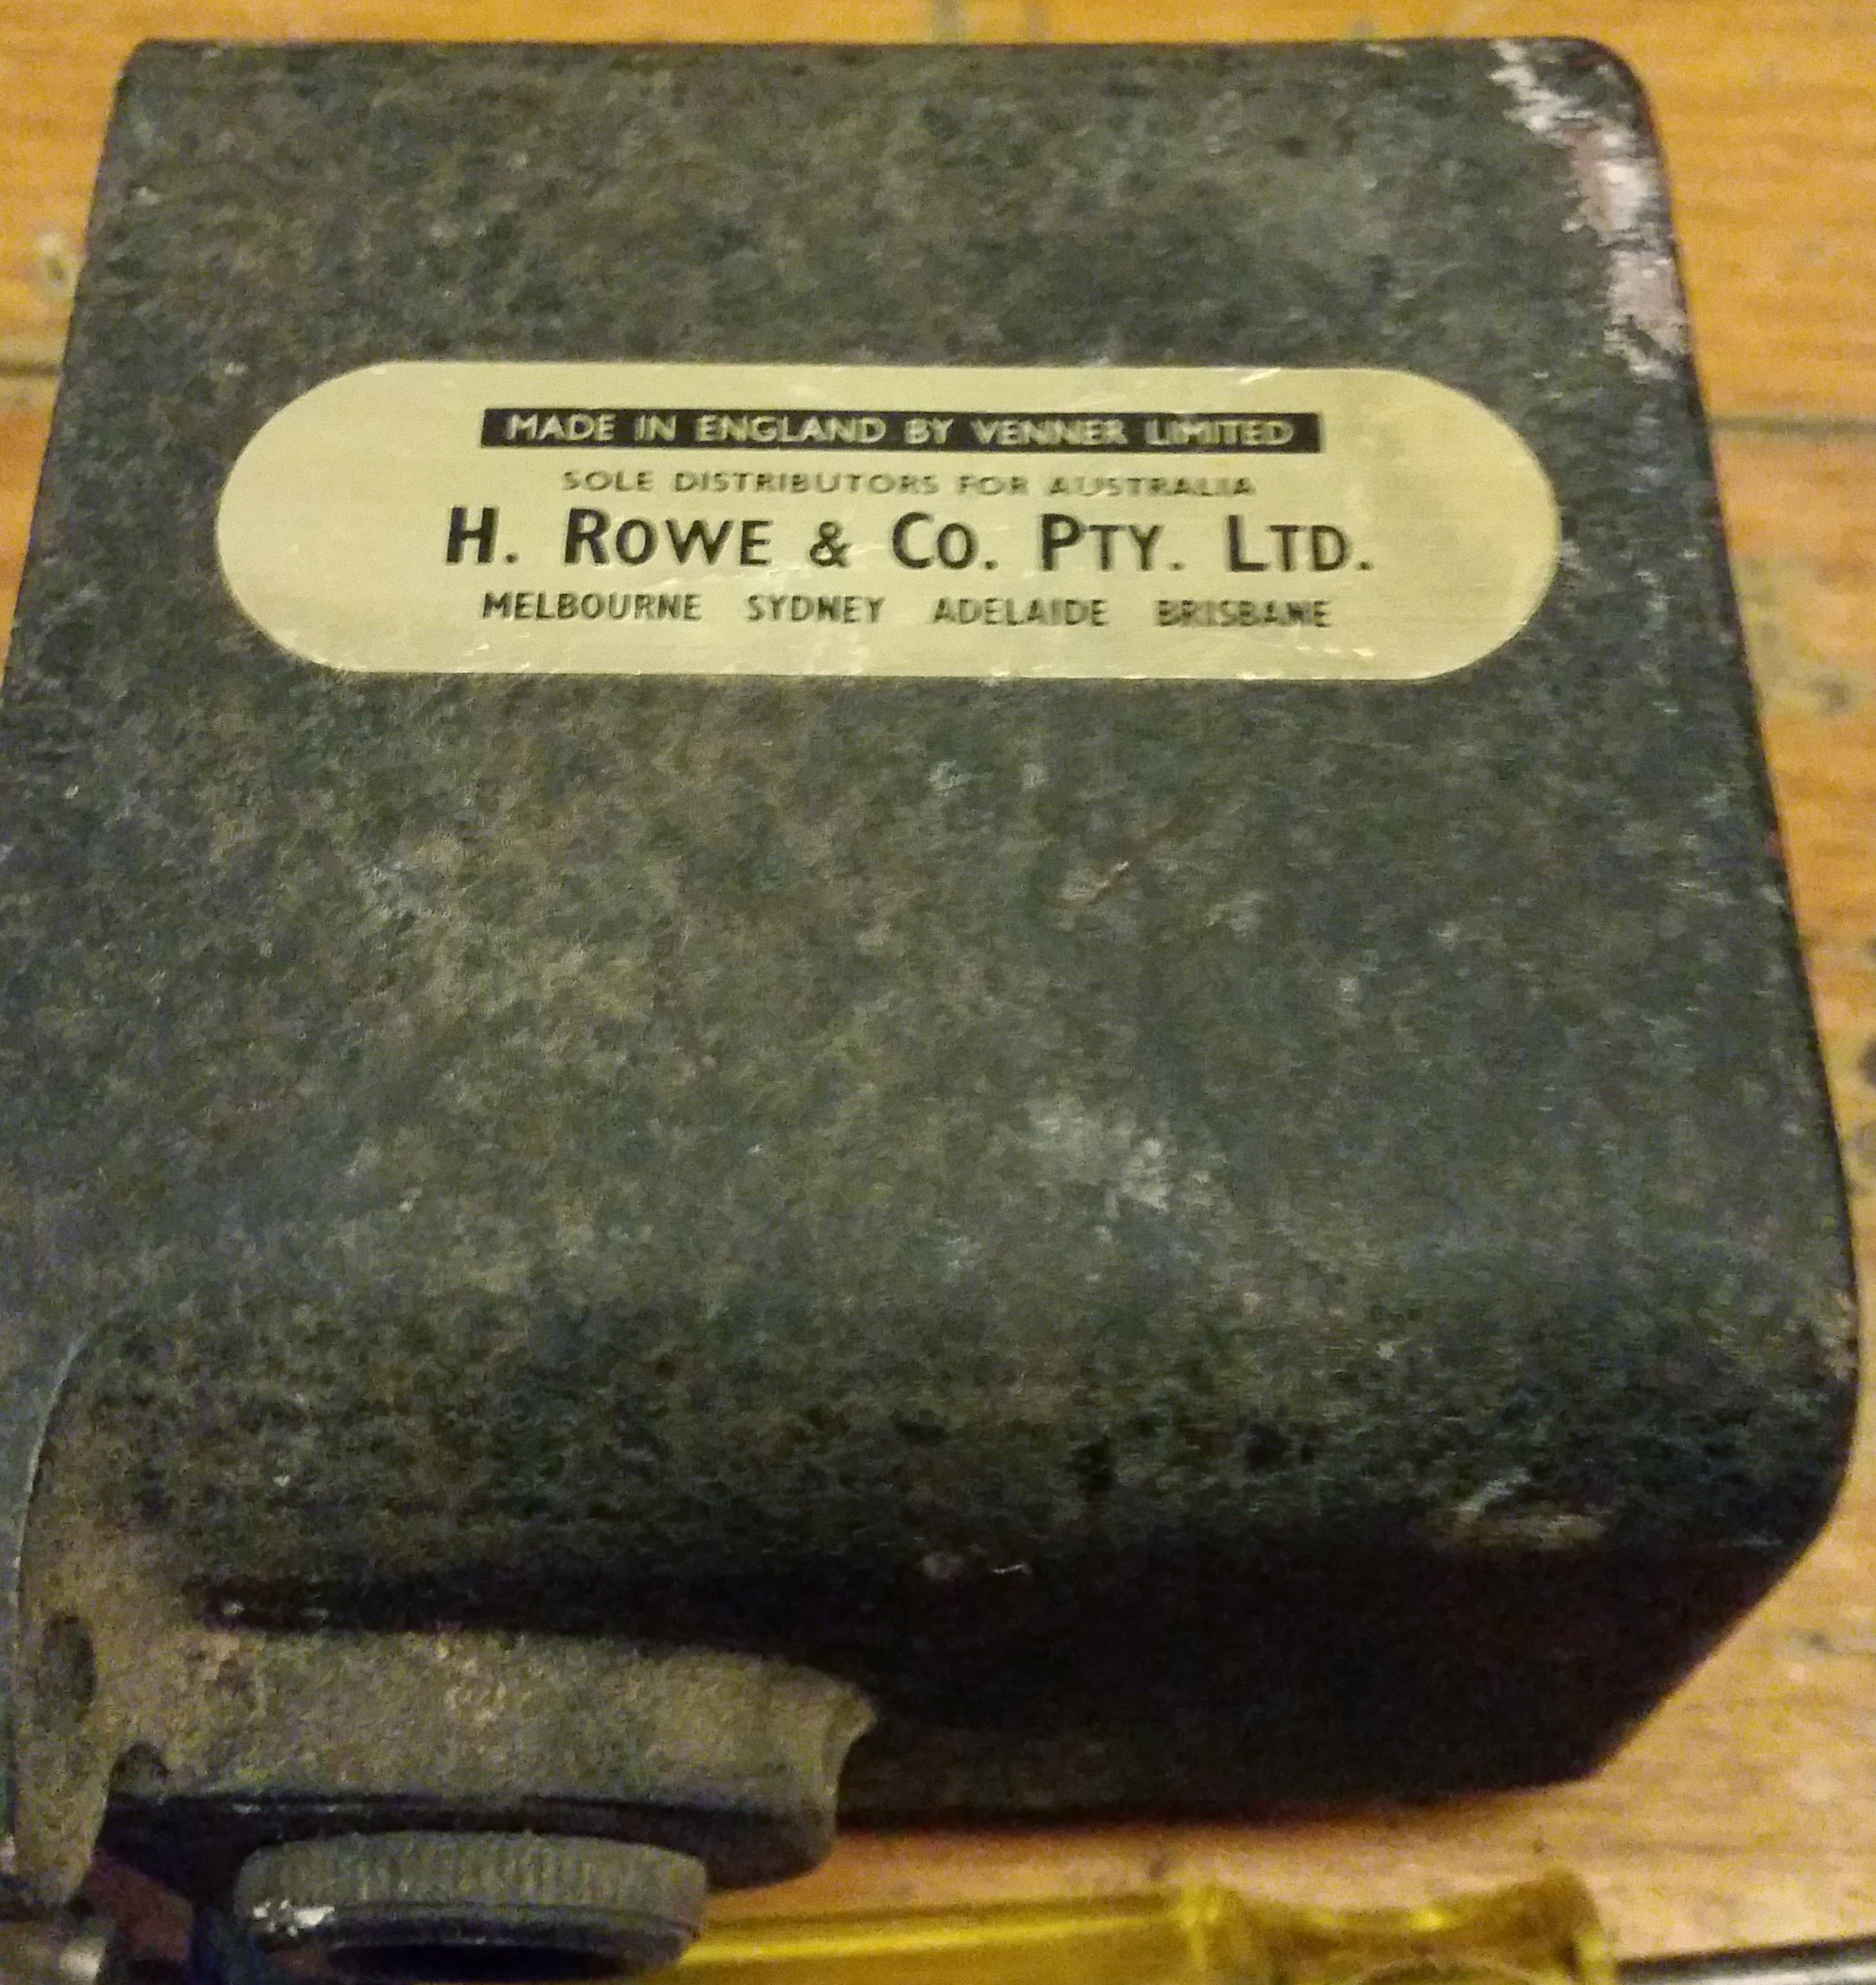
This Sticker is in remarkable shape compared to the rest of the unit. Guessing its aluminium.
20140810_212008

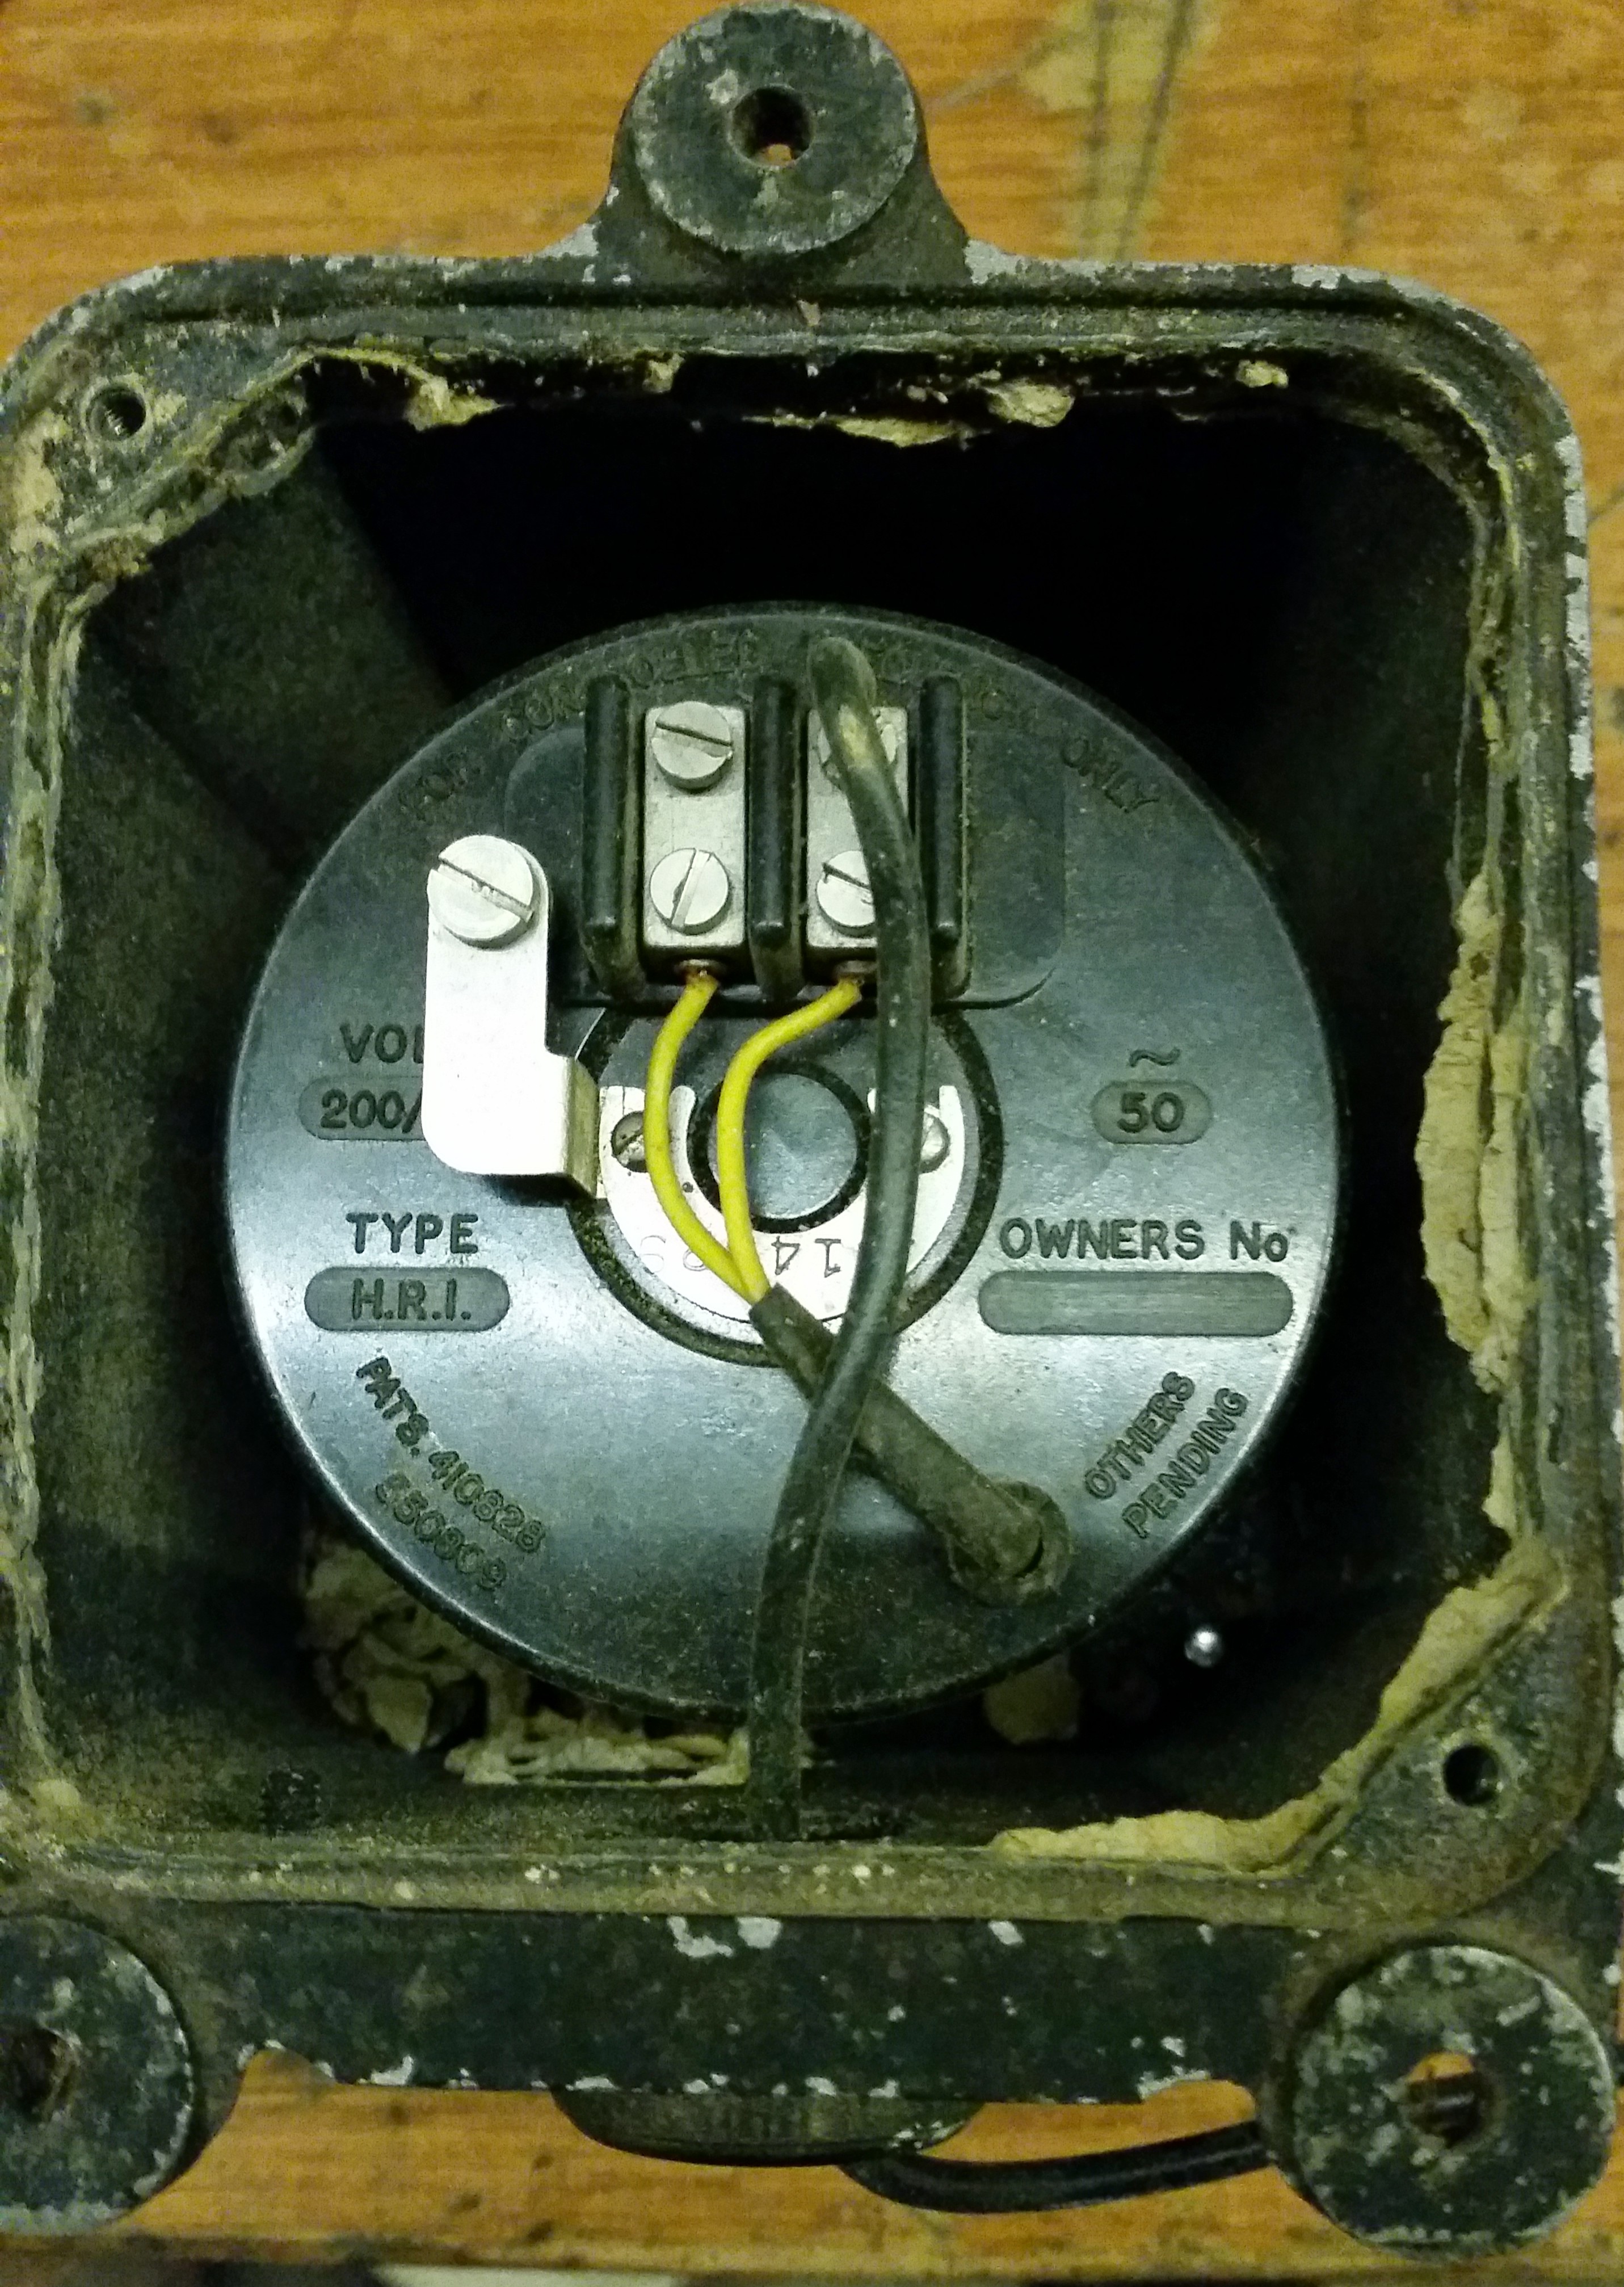
One wire goes into the device so I’m unsure how the wiring is meant to go. I’m guessing it’s as easy as Live and Neutral wire hookup to make the thing work. On the left there you can see the 200V mark. This is partly hidden but its 200-250V. To bad it doesn’t operate on DC Voltage. Maybe one day I could get an electrician to wire it into the shed circuit…. Stats!
20140810_211728


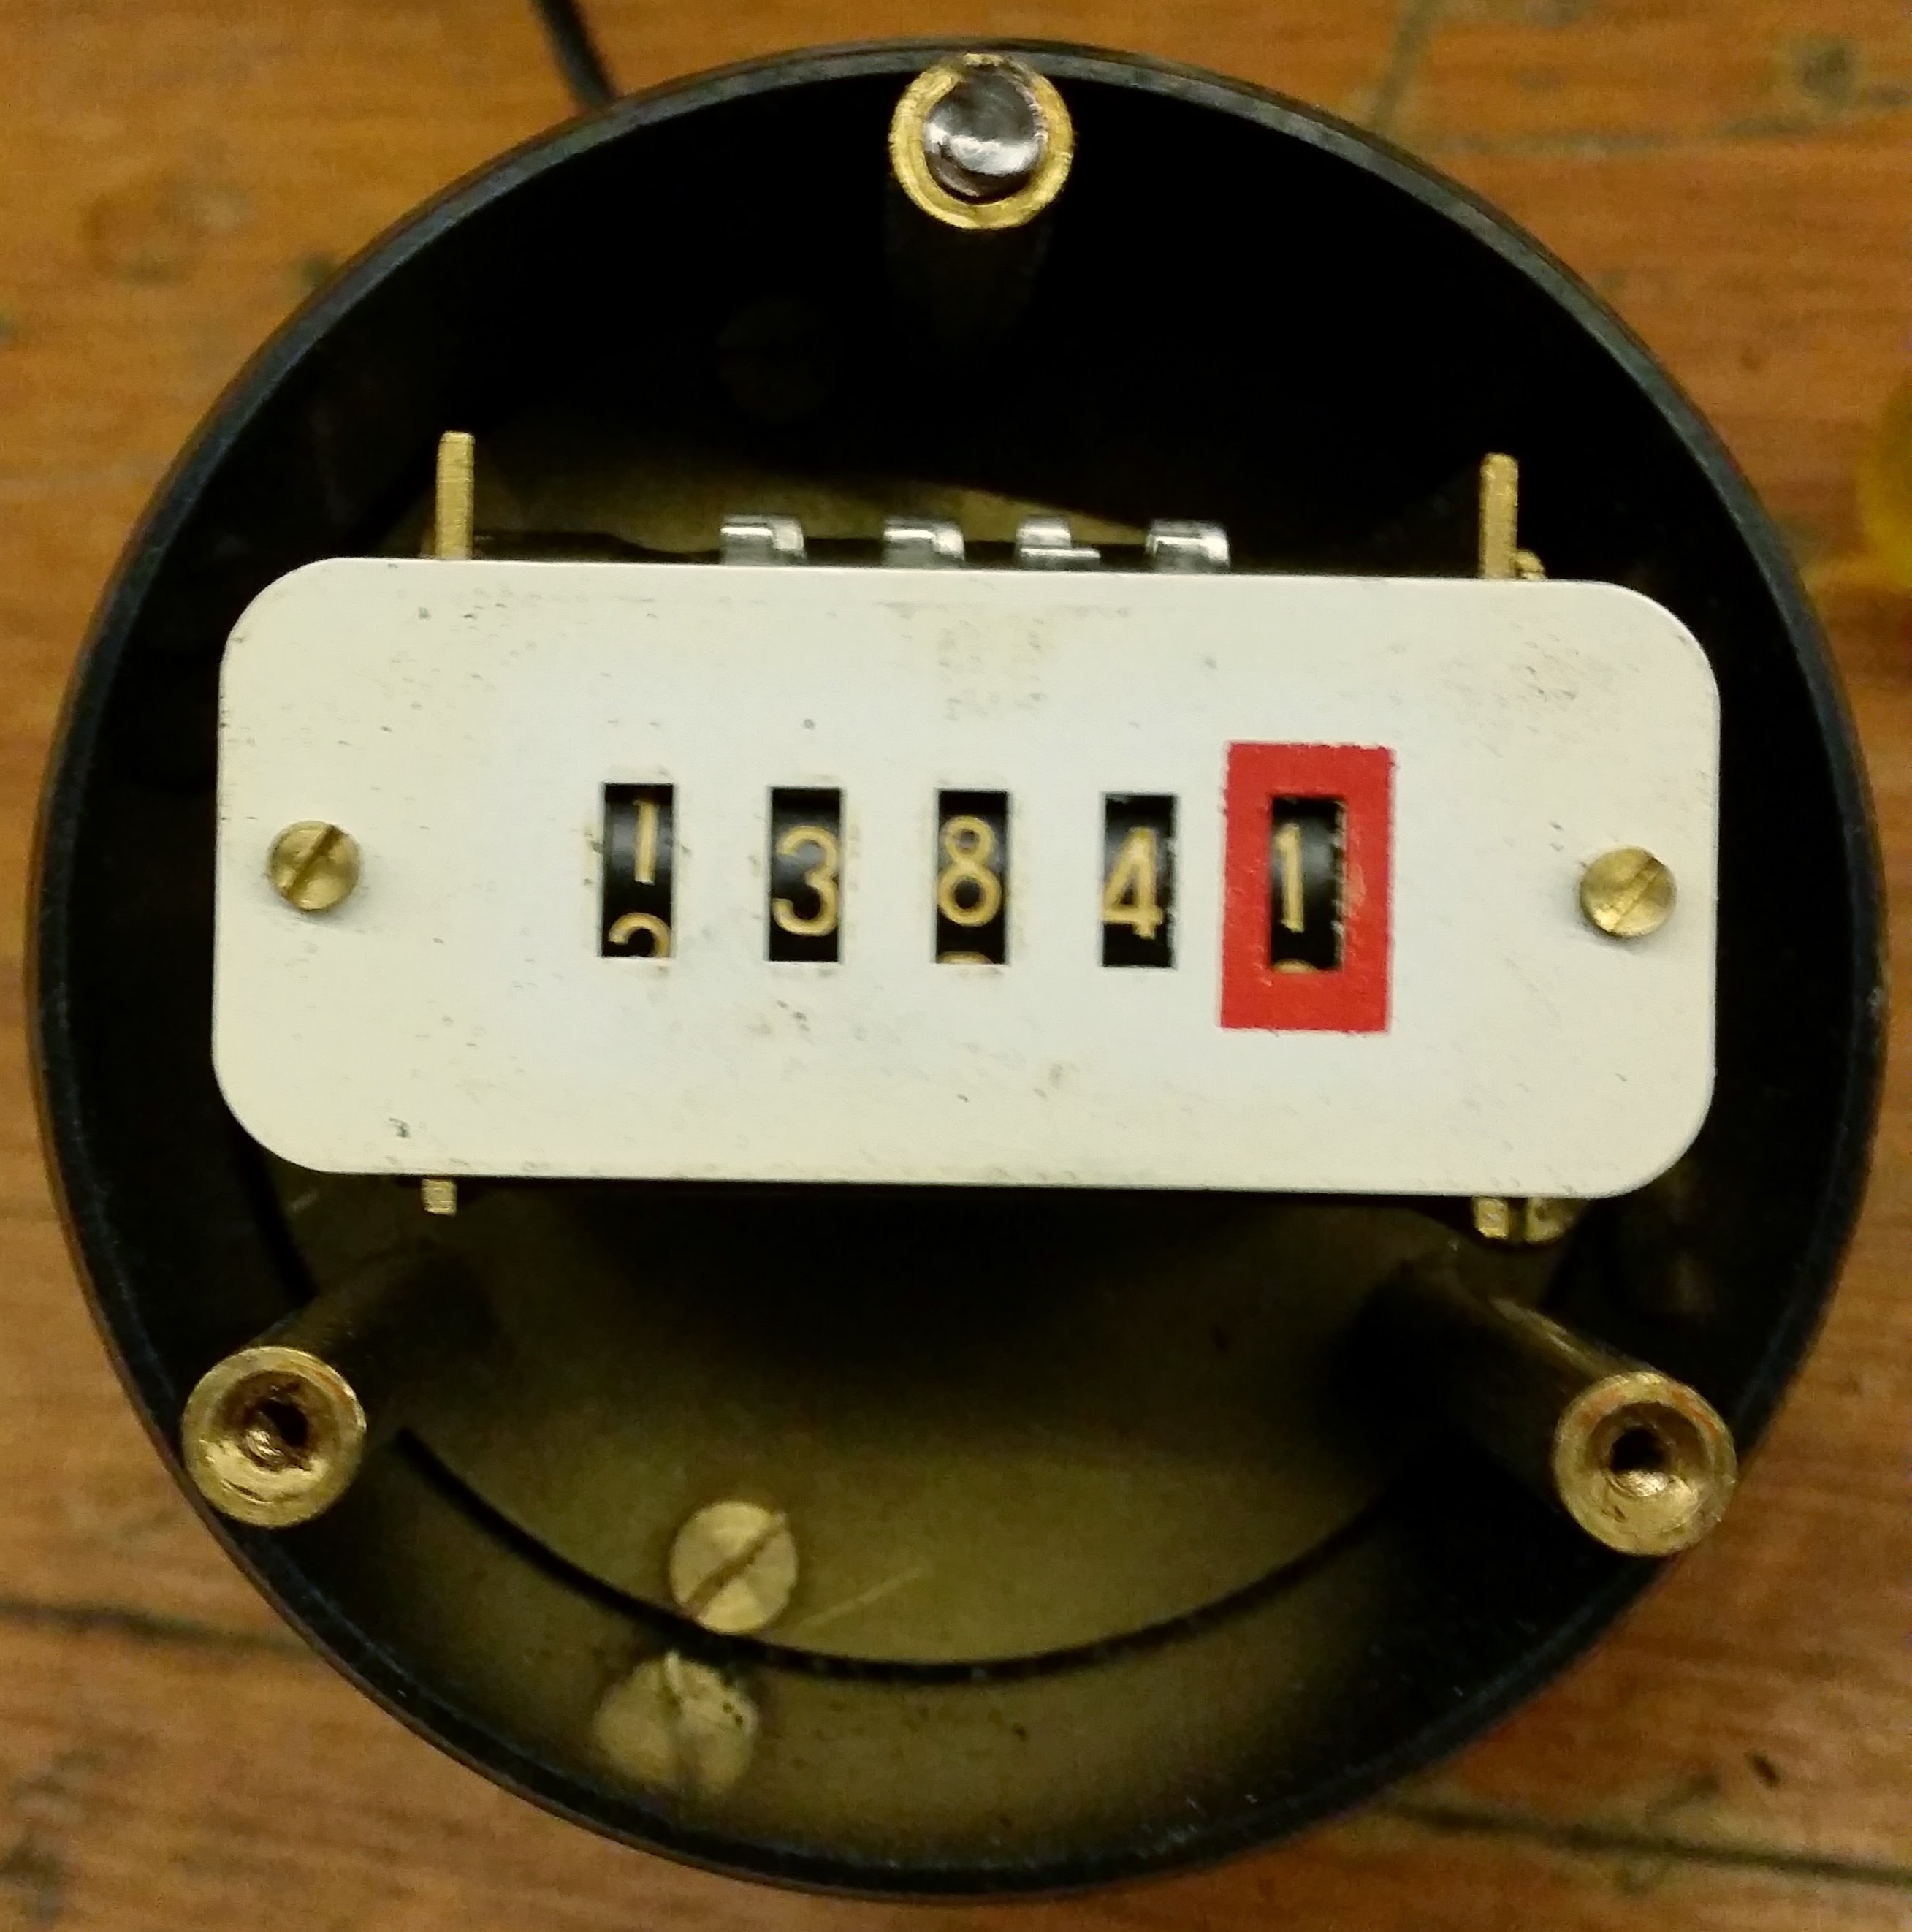
Might be able to re-use the counter somewhere? I’ll add it into the Electronic scrap pile for future. At the very least I can use the enclosure on something.
20140810_213128

Posted in Paraphernalia | Tagged , | Leave a comment

Shelves!


In my attempts to get organized I decided there was to much wasted space above the tool area. I also had some nice timber I had removed from inside the house. A half put together dodgy looking built-in that came with the house. Conclusion: Shelves! This also bought up in my mind that they should have some backing I could also visualize Pegboard to hang some of those things that just don’t go anywhere else. A quick trip to the hardware store and I came back with some Shelf brackets and some particle board. Huh? You said pegboard? Pegboard was $42 a sheet at 1200 x 900!!! this particle board was $16 for the same size sheet and thick enough to screw, nail or bash with a hammer (who doesn’t enjoy hitting things with a hammer) Now I can empty out the bench below it which was to low to comfortable grab stuff that was used a lot and I can put all the electric tools in and such. All the handy stuff can go on the shelf

20140809_165908

IMG_20140809_164550-nopm-

Posted in Shed | Tagged , , , | Leave a comment

Shed Sort and Cleanup

Attempts have been under way to clean up the shed so its a usable space again. As opposed to somewhere to dump stuff and keep tools 🙂

These pics are where its at now and it looks kinda bad even though this is AFTER multiple passes at cleaning! HA! I kept forgetting to take damn photos of the un-heavenly mess that was there before. Which is probably okay since it would make your soul hurt.

Its good having actual floor space to casually walk through. Also Bench space! Have you ever had so much shit laying around that there’s no room to put it so you put it on the floor in any available gap? Well, that’s what the shed was like. When you actually try and sort some stuff there’s no space available to sort. Nor can you get to some of the places where the sorted stuff is meant to live! Fortunately this time of apocalypse has passed and I now have room again!

20140808_174835 20140808_174901 20140808_174856

Posted in Shed | Tagged , , | Leave a comment

Introducing PowerArdy!

My second PCB Ever has been sent of for fabrication! I’ve been lazy and haven’t posted my first Circuit Board Ever yet. This will replace my Current Cost Envi unit which has been beavering away for a few years now with 2 current Sensors. Since adding Solar to the house 2 isn’t enough. I have one Sensor on the total house power circuit (Mains) and the other around the Heating Circuit which services the Hot water Cylinder and the Heatpump. I pull 3 totals out of this by subtracting the Heat circuit off the total power circuit to give me the leftover which is powerpoints and Lights. There has been some anomalies with this which to be honest I haven’t looked into my code to see if its a bug there or something else. The new PowerArdy has 4 Current sensors on it! They will monitor:

  • Lights and Power
  • Heater Circuit
  • Solar Production
  • Total Power

This will hopefully fix the anomaly with my data. The other problem I have with the old setup is when I have a surplus of power from the solar and it starts exporting to the grid it appears as power consumption on my graphs! No good at all. I’ve also gone pro by adding a 9V AC-AC Powersupply that will monitor the line voltage to calculate power factor. This in turn lets you calculate real power value properly. Also in the mix, as this unit will be by the Front door, I’ve added a PIR sensor for motion detection, a TMP36 temperature sensor, a light sensor and a button. The button is for a coming Doorbell button. Which as it happens is how I started playing with Arduino stuff in the first place! I just wanted a doorbell! I have a lot of trouble hearing anybody at the door which I plan on fixing with a very loud old school Siren I have around here somewhere. Awesome sauce…… once its setup 🙂 Also included is a Xbee to shoot all the data through to motherhub.

Here is the PCB layout of the new board

Capture


I hope its all correct! Will be a 4-8 weeks before I see the boards yet so I have some time to wait. In the meantime I’ve ordered all the other parts I don’t have here. Version 2 of this will probably have a arduino included in the design instead of being an Arduino shield as it is now.

Posted in Arduino, Electronics, SensorNet | Tagged , , , , | 1 Comment

Best Battery Ever

Found this in an ancient laptop the other day. I would love it if Duracell still did stuff like this. When you’re used to seeing smaller AA’s of the same brand and colours it’s amazeballs to stumble on something like this.

Dangertech Approved.


IMG_1245

Posted in Electronics, Uncategorized | Tagged , , | Leave a comment

Reading a Serial output from Arduino with Python V1

This is my first try at Python. It reads the Serial Output from Serial 3 on MotherHub. I had some problems with it randomly throwing exceptions, I seemed to have solved that with some If statements that count the amount of variables. The next 24 hours will be the big test as I just set the script up as a service for uninterrupted SQL insertions 🙂 I’m sure this script will expand over the coming months.

import serial
import MySQLdb
import datetime
from time import sleep
 
ser = serial.Serial('/dev/ttyAMA0', 9600, timeout=0) # This is using the serial GPIO pins on the Raspberry Pi, Pins 14 and 15
conn = MySQLdb.connect( host='Your MySQL server IP', db='SensorDB', user='SensorDBUser', passwd='SensorDBPass' ) #Change these to suit
cursor = conn.cursor()
count = 0
 
while True:
 data = ser.read(9999).strip("\r\n")
 parsed = data.split(",")
 sleep(0.5)
 if len(data) >= 54:
 print 'Serial Packet Length:', len(data)
 print 'Got:', data
 print 'parsed:', parsed
 templist = data.split(',')
 print 'Length:', len(templist)
# print templist
 if len(templist) < 12: #If there arent 12 items parsed from the Arduino output string then somethings not right, Go to Jail. Do not pass Go
 print 'ERROR! BZZZZZZZZZ!'
 continue
 else:
 print 'templist[0]:', templist[0]
 print 'templist[1]:', templist[1]
 print 'templist[2]:', templist[2]
 print 'templist[3]:', templist[3]
 print 'templist[4]:', templist[4]
 print 'templist[5]:', templist[5]
 print 'templist[6]:', templist[6]
 print 'templist[7]:', templist[7]
 print 'templist[8]:', templist[8]
 print 'templist[9]:', templist[9]
 print 'templist[10]:', templist[10]
 print 'templist[11]:', templist[11]
 
 # Prepare SQL query to INSERT a record into the database.
 sql = "INSERT INTO tblSensorData(fldCommsMotion, fldCommsTemp, fldCommsBarometer, fldCommsHumidity, fldCommsLux, fldXbee1Temp, fldXbee1Volt, fldXbee1Battery, fldXbee1SolarV, fldTotalPowerUse, fl dHeatuse, fldLightPower) \
 VALUES ('%s', '%s', '%s', '%s', '%s', '%s', '%s', '%s', '%s', '%s', '%s', '%s' )" % \
 (templist[0], templist[1], templist[2], templist[3], templist[4], templist[5], templist[6], templist[7], templist[8], templist[9], templist[10], templist[11])
 print"sql ready for execution"
  # Execute the SQL command
 cursor.execute(sql)
 print"SQL Injected!"
 count = count + 1
 print 'SQL Update Count:', count #This is just so I can easily see how many updates have processed before an exception
# Commit your changes in the database
 conn.commit()
 
#sleep(1)
print 'not blocked'
 
conn.close()
ser.close()

MySQL Data is logging! This is massive motivation to get more sensors online. Even though I don’t have a frontend yet I know the data is there to play with.

SQLData


In my travels with PHPMyAdmin I just noticed it has some basic graphing function! Amazing! When did they add that? Now I’ve noticed a problem with the power records


PHPMyADmin graphI have 2 sensors monitoring Power. One on the mains for the entire house and one on the Heating Circuit which does the hot water cylinder at the Heat pump. To calculate the lights and power circuit I simply minus the Heating circuit off the total power circuit. The graph however is showing that every time the heater comes on the power use for the house drops considerably. This is not correct. The difference between the Heating consumption and the total should always be consistent. I’m tempted to look further into this but at the same time I could put those efforts into completing my new energy monitor. I’ll think on it awhile and see if something comes to me


Posted in Arduino, Computing, Electronics, MySQL, phpMyAdmin, Python, Raspberry Pi, SensorNet | Tagged , , , , , | Leave a comment

Run Python code as a service

Testing of my python script that reads the serial output from MotherHub seems stable enough to run fulltime now. What I’ve found is though that everytime I turn my PC off my SSH session will time out and kill the python script from running. What I need is a way to run it all the time and auto start it after a reboot. Peiter Vanos has just the thing! I am reposting here for my own reference later. You can find the original code at http://www.pietervanos.net

1. place your python script in the following folder: /usr/local/sbin/ (This can be anywhere you like)
2. create a new file in /etc/init.d/ in this case it will be example, so sudo nano /etc/init.d/example
3. Use the following code for the example file

#! /bin/sh
# /etc/init.d/example
 
case "$1" in
start)
echo "Starting example"
# run application you want to start
python /usr/local/sbin/example.py &
;;
stop)
echo "Stopping example"
# kill application you want to stop
killall python
;;
*)
echo "Usage: /etc/init.d/example{start|stop}"
exit 1
;;
esac
 
exit 0

4. give the file execute rights, sudo chmod 755 example
5. now execute: sudo update-rc.d example defaults

When you reboot raspbian it should automatically start the python script, else try service example start and service example stop


This worked like a charm for me. I could see SQL entries within a minute! Now to see if it can run 24/7 with no problems

Posted in Linux, Python, Raspberry Pi, SensorNet | Tagged , , | 1 Comment

Home SensorNet Overview

I have an ongoing project that involves my house and sensors. I’ve been working on and off on this as enthusiasm warrants but failing to actually post anything about it on dangertech. So this is it, I’m going to give a general overview interspersed with pictures as a starting point and see what happens. I plan on sensoring the shit out of my home. Sensors in every room that include at a bare minimum Temperature, motion and light levels. There are many more add-ons I want to achieve including Oven temperatures, Freezer temp, Water flow etc etc etc etc. I love stats and cant get enough.

SensorNet aka. Motherhub is an Arduino Mega2560 that runs the network of Xbees and arduinos around the house which so far consists of:

  • Arduino Mega2560 as MotherHub
  • Arduino UNO as data parser from power meter
  • Xbee Co-Ordinator as base unit for Xbee network
  • Outdoor Xbee Temp Sensor that also reports on battery level and solar Voltage
  • CurrentCost Energy Meter measuirng the mains power and outputting to above UNO

Ha. After listing that it doesn’t look like much for the hours of work I’ve poured in. There are also a few projects not completed enough that they are included in the above list:

Arduino UNO Weather unit

  • Wind Speed
  • Wind Direction
  • Rain Gauge
  • Temperature

This one is a little cheaty as it incorporates some Sparkfun parts. The wind and rain sensor are here and a convenient Ardy shield with some nice code on Github are here. To finish this I need to:

  • Xbee hooked up and coded
  • Power requirements calculated to run from solar and a battery
  • Housing designed and printed/built

Arduino House Foyer Sensor Node 

This is all Bread boarded up and tested. It includes:

  • 2 temperature sensors to monitor the hot water cylinder.
  • Room temp and humidity Sensors
  • Light Sensor
  • Motion Sensor

For completion it needs:

  • PCB to be designed and built
  • An enclosure

Arduino Power Monitor Node
This is to replace my CurrentCost device. It has served really well but since adding Solar to the house I need MOAR(tm) control. I currently monitor total power use and the HydroHeat circuits. The new unit will be capable of monitoring 4 circuits. Solar, power and lights, Hydroheat and Total Power consumption. As this sits by the front door it will also need to act as a doorbell, Light sensor, motion sensor and also temperature while communicating wirelessly to MotherHub through an xbee! A busy unit.

Things left to do:

  • Finish circuit board design
  • Enclosure
  • Arduino Code

Data Logging to MySQL and Web Frontend
Motherhub currently logs to Xively here. I want more control of the data and unlimited logging of that data over time which I haven’t seen offered by anyone else yet(for free). I’m sending data from MotherHub to a Python Script running on a Raspberry Pi at the moment. My NAS has an instance of MYSQL running so I log the data there. I could run python on the NAS or even my linux proxy server so save one device and its power consumption (not that the Pi uses much) but future wise I may move all of the sensor processing to the python script and more powerful Pi. Depends how MotherHub can handle 10-20 Xbees sending in packets and all the sensor processing 🙂 I’ve just made good progress on this by getting data into the database. No doubt I have a lot more time to be spent here.

  • Testing Script robustness when accepting data over serial from MotherHub
  • Running script as daemon on the Pi
  • PHP Front end to display graphs

Learning all this as I go but really starting to have fun with it. PCB design and Python being the latest skills I’ve started learning and have to admit enjoying immensely.

This is a great start to Documenting this whole thing! I have more of a plan after putting this to a post. I will do separate posts dealing individually with the different nodes that will include all the finer details of PCB designs and code. I know I said there would be pictures at the top of this post but i think its long enough already. I will add them in to the detailed posts of each arm of the project.If you have read all this then hopefully future posts can help you achieve your own SensorNet 2000 😛 I want to hear about it!

Posted in Arduino, Electronics, Raspberry Pi, SensorNet | Tagged , , , , , | Leave a comment

Kill it Now Patch Cabling! Part 2

It’s 11 Months on since the last photo and at least it looks better! Still a ways to go 🙂

patching pt2


Old shot, May 2013.

stuff 002

Posted in Computing, Networking | Tagged , , , | Leave a comment
« Older
Newer »