Found this in an ancient laptop the other day. I would love it if Duracell still did stuff like this. When you’re used to seeing smaller AA’s of the same brand and colours it’s amazeballs to stumble on something like this.
Dangertech Approved.

Found this in an ancient laptop the other day. I would love it if Duracell still did stuff like this. When you’re used to seeing smaller AA’s of the same brand and colours it’s amazeballs to stumble on something like this.
Dangertech Approved.
This is my first try at Python. It reads the Serial Output from Serial 3 on MotherHub. I had some problems with it randomly throwing exceptions, I seemed to have solved that with some If statements that count the amount of variables. The next 24 hours will be the big test as I just set the script up as a service for uninterrupted SQL insertions 🙂 I’m sure this script will expand over the coming months.
import serial import MySQLdb import datetime from time import sleep ser = serial.Serial('/dev/ttyAMA0', 9600, timeout=0) # This is using the serial GPIO pins on the Raspberry Pi, Pins 14 and 15 conn = MySQLdb.connect( host='Your MySQL server IP', db='SensorDB', user='SensorDBUser', passwd='SensorDBPass' ) #Change these to suit cursor = conn.cursor() count = 0 while True: data = ser.read(9999).strip("\r\n") parsed = data.split(",") sleep(0.5) if len(data) >= 54: print 'Serial Packet Length:', len(data) print 'Got:', data print 'parsed:', parsed templist = data.split(',') print 'Length:', len(templist) # print templist if len(templist) < 12: #If there arent 12 items parsed from the Arduino output string then somethings not right, Go to Jail. Do not pass Go print 'ERROR! BZZZZZZZZZ!' continue else: print 'templist[0]:', templist[0] print 'templist[1]:', templist[1] print 'templist[2]:', templist[2] print 'templist[3]:', templist[3] print 'templist[4]:', templist[4] print 'templist[5]:', templist[5] print 'templist[6]:', templist[6] print 'templist[7]:', templist[7] print 'templist[8]:', templist[8] print 'templist[9]:', templist[9] print 'templist[10]:', templist[10] print 'templist[11]:', templist[11] # Prepare SQL query to INSERT a record into the database. sql = "INSERT INTO tblSensorData(fldCommsMotion, fldCommsTemp, fldCommsBarometer, fldCommsHumidity, fldCommsLux, fldXbee1Temp, fldXbee1Volt, fldXbee1Battery, fldXbee1SolarV, fldTotalPowerUse, fl dHeatuse, fldLightPower) \ VALUES ('%s', '%s', '%s', '%s', '%s', '%s', '%s', '%s', '%s', '%s', '%s', '%s' )" % \ (templist[0], templist[1], templist[2], templist[3], templist[4], templist[5], templist[6], templist[7], templist[8], templist[9], templist[10], templist[11]) print"sql ready for execution" # Execute the SQL command cursor.execute(sql) print"SQL Injected!" count = count + 1 print 'SQL Update Count:', count #This is just so I can easily see how many updates have processed before an exception # Commit your changes in the database conn.commit() #sleep(1) print 'not blocked' conn.close() ser.close() |
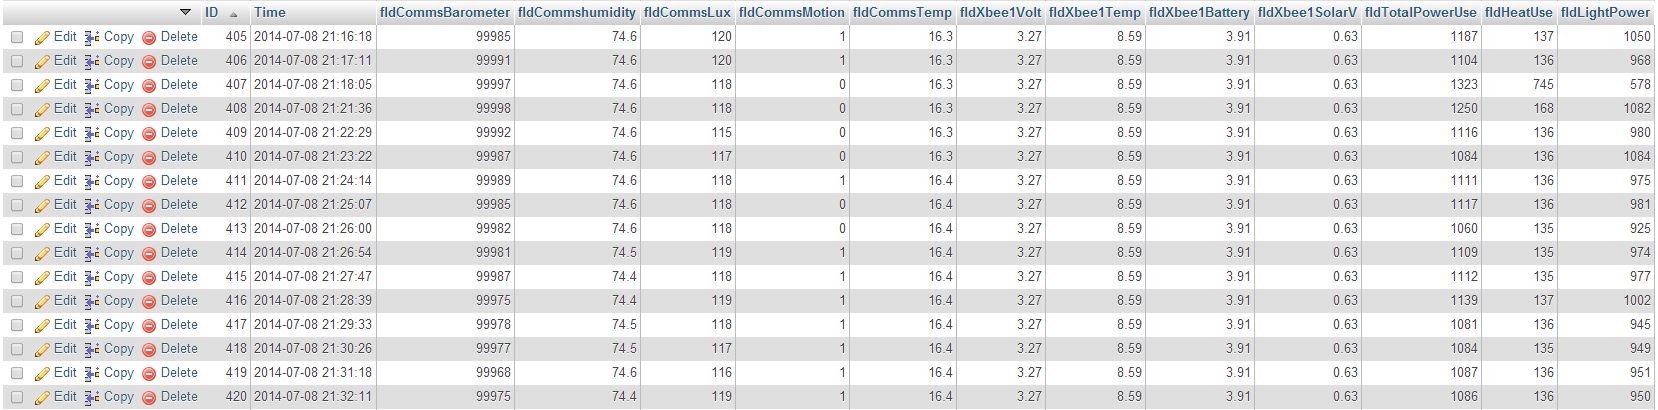
MySQL Data is logging! This is massive motivation to get more sensors online. Even though I don’t have a frontend yet I know the data is there to play with.
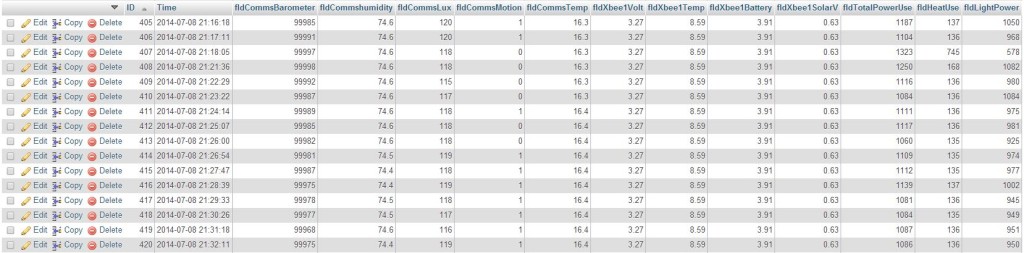
In my travels with PHPMyAdmin I just noticed it has some basic graphing function! Amazing! When did they add that? Now I’ve noticed a problem with the power records
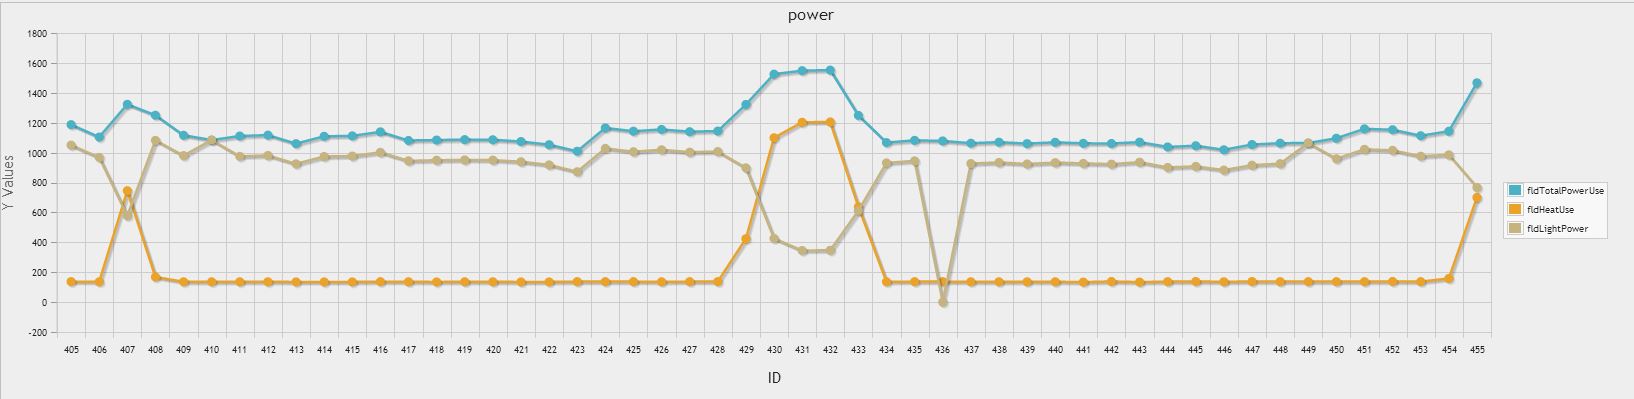 I have 2 sensors monitoring Power. One on the mains for the entire house and one on the Heating Circuit which does the hot water cylinder at the Heat pump. To calculate the lights and power circuit I simply minus the Heating circuit off the total power circuit. The graph however is showing that every time the heater comes on the power use for the house drops considerably. This is not correct. The difference between the Heating consumption and the total should always be consistent. I’m tempted to look further into this but at the same time I could put those efforts into completing my new energy monitor. I’ll think on it awhile and see if something comes to me
Testing of my python script that reads the serial output from MotherHub seems stable enough to run fulltime now. What I’ve found is though that everytime I turn my PC off my SSH session will time out and kill the python script from running. What I need is a way to run it all the time and auto start it after a reboot. Peiter Vanos has just the thing! I am reposting here for my own reference later. You can find the original code at http://www.pietervanos.net
1. place your python script in the following folder: /usr/local/sbin/ (This can be anywhere you like)
2. create a new file in /etc/init.d/ in this case it will be example, so sudo nano /etc/init.d/example
3. Use the following code for the example file
#! /bin/sh # /etc/init.d/example case "$1" in start) echo "Starting example" # run application you want to start python /usr/local/sbin/example.py & ;; stop) echo "Stopping example" # kill application you want to stop killall python ;; *) echo "Usage: /etc/init.d/example{start|stop}" exit 1 ;; esac exit 0 |
4. give the file execute rights, sudo chmod 755 example
5. now execute: sudo update-rc.d example defaults
When you reboot raspbian it should automatically start the python script, else try service example start and service example stop
This worked like a charm for me. I could see SQL entries within a minute! Now to see if it can run 24/7 with no problems
I have an ongoing project that involves my house and sensors. I’ve been working on and off on this as enthusiasm warrants but failing to actually post anything about it on dangertech. So this is it, I’m going to give a general overview interspersed with pictures as a starting point and see what happens. I plan on sensoring the shit out of my home. Sensors in every room that include at a bare minimum Temperature, motion and light levels. There are many more add-ons I want to achieve including Oven temperatures, Freezer temp, Water flow etc etc etc etc. I love stats and cant get enough.
SensorNet aka. Motherhub is an Arduino Mega2560 that runs the network of Xbees and arduinos around the house which so far consists of:
Ha. After listing that it doesn’t look like much for the hours of work I’ve poured in. There are also a few projects not completed enough that they are included in the above list:
Arduino UNO Weather unit
This one is a little cheaty as it incorporates some Sparkfun parts. The wind and rain sensor are here and a convenient Ardy shield with some nice code on Github are here. To finish this I need to:
Arduino House Foyer Sensor Node
This is all Bread boarded up and tested. It includes:
For completion it needs:
Arduino Power Monitor Node
This is to replace my CurrentCost device. It has served really well but since adding Solar to the house I need MOAR(tm) control. I currently monitor total power use and the HydroHeat circuits. The new unit will be capable of monitoring 4 circuits. Solar, power and lights, Hydroheat and Total Power consumption. As this sits by the front door it will also need to act as a doorbell, Light sensor, motion sensor and also temperature while communicating wirelessly to MotherHub through an xbee! A busy unit.
Things left to do:
Data Logging to MySQL and Web Frontend
Motherhub currently logs to Xively here. I want more control of the data and unlimited logging of that data over time which I haven’t seen offered by anyone else yet(for free). I’m sending data from MotherHub to a Python Script running on a Raspberry Pi at the moment. My NAS has an instance of MYSQL running so I log the data there. I could run python on the NAS or even my linux proxy server so save one device and its power consumption (not that the Pi uses much) but future wise I may move all of the sensor processing to the python script and more powerful Pi. Depends how MotherHub can handle 10-20 Xbees sending in packets and all the sensor processing 🙂 I’ve just made good progress on this by getting data into the database. No doubt I have a lot more time to be spent here.
Learning all this as I go but really starting to have fun with it. PCB design and Python being the latest skills I’ve started learning and have to admit enjoying immensely.
This is a great start to Documenting this whole thing! I have more of a plan after putting this to a post. I will do separate posts dealing individually with the different nodes that will include all the finer details of PCB designs and code. I know I said there would be pictures at the top of this post but i think its long enough already. I will add them in to the detailed posts of each arm of the project.If you have read all this then hopefully future posts can help you achieve your own SensorNet 2000 😛 I want to hear about it!