Introducing PowerArdy!

My second PCB Ever has been sent of for fabrication! I’ve been lazy and haven’t posted my first Circuit Board Ever yet. This will replace my Current Cost Envi unit which has been beavering away for a few years now with 2 current Sensors. Since adding Solar to the house 2 isn’t enough. I have one Sensor on the total house power circuit (Mains) and the other around the Heating Circuit which services the Hot water Cylinder and the Heatpump. I pull 3 totals out of this by subtracting the Heat circuit off the total power circuit to give me the leftover which is powerpoints and Lights. There has been some anomalies with this which to be honest I haven’t looked into my code to see if its a bug there or something else. The new PowerArdy has 4 Current sensors on it! They will monitor:

  • Lights and Power
  • Heater Circuit
  • Solar Production
  • Total Power

This will hopefully fix the anomaly with my data. The other problem I have with the old setup is when I have a surplus of power from the solar and it starts exporting to the grid it appears as power consumption on my graphs! No good at all. I’ve also gone pro by adding a 9V AC-AC Powersupply that will monitor the line voltage to calculate power factor. This in turn lets you calculate real power value properly. Also in the mix, as this unit will be by the Front door, I’ve added a PIR sensor for motion detection, a TMP36 temperature sensor, a light sensor and a button. The button is for a coming Doorbell button. Which as it happens is how I started playing with Arduino stuff in the first place! I just wanted a doorbell! I have a lot of trouble hearing anybody at the door which I plan on fixing with a very loud old school Siren I have around here somewhere. Awesome sauce…… once its setup 🙂 Also included is a Xbee to shoot all the data through to motherhub.

Here is the PCB layout of the new board

Capture


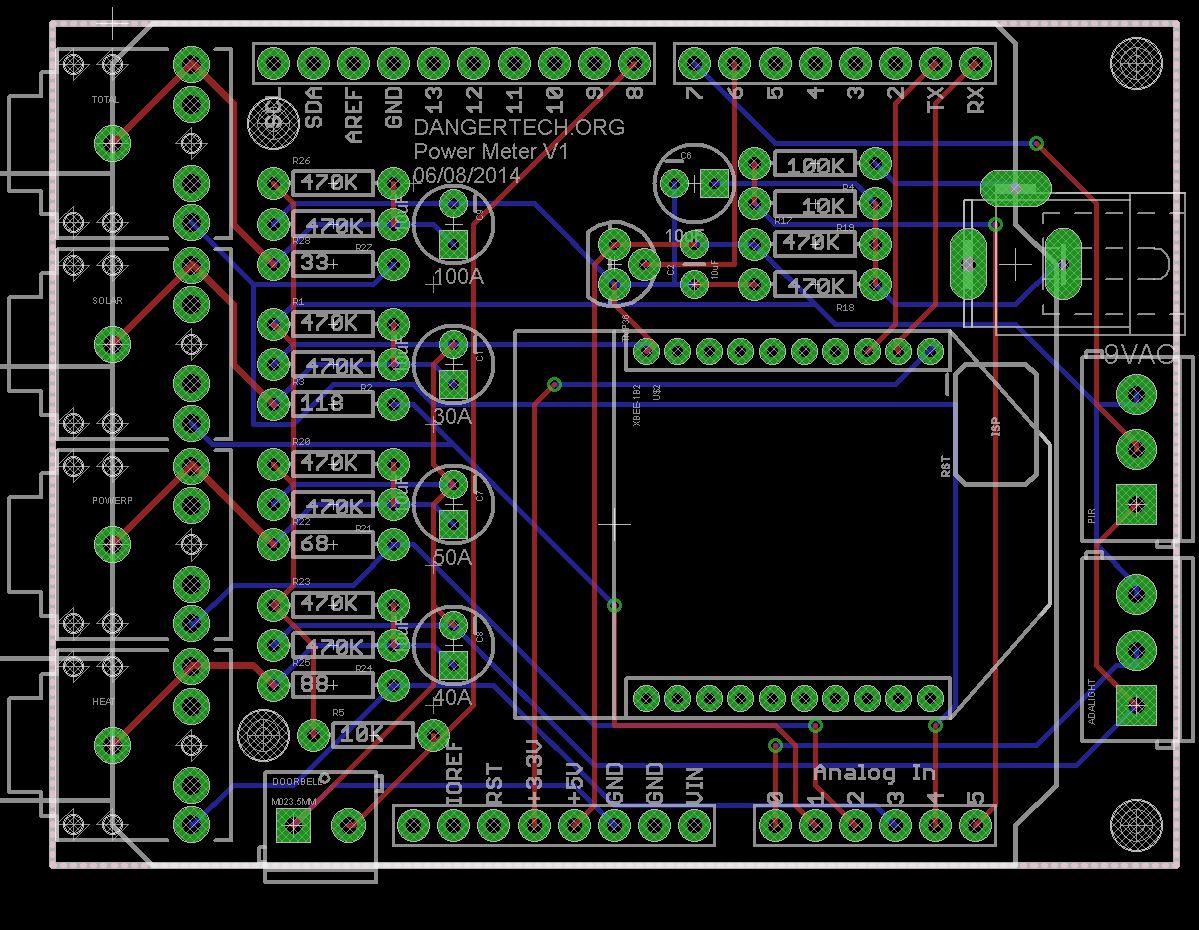
I hope its all correct! Will be a 4-8 weeks before I see the boards yet so I have some time to wait. In the meantime I’ve ordered all the other parts I don’t have here. Version 2 of this will probably have a arduino included in the design instead of being an Arduino shield as it is now.

Posted in Arduino, Electronics, SensorNet | Tagged , , , , | 1 Comment

Home SensorNet Overview

I have an ongoing project that involves my house and sensors. I’ve been working on and off on this as enthusiasm warrants but failing to actually post anything about it on dangertech. So this is it, I’m going to give a general overview interspersed with pictures as a starting point and see what happens. I plan on sensoring the shit out of my home. Sensors in every room that include at a bare minimum Temperature, motion and light levels. There are many more add-ons I want to achieve including Oven temperatures, Freezer temp, Water flow etc etc etc etc. I love stats and cant get enough.

SensorNet aka. Motherhub is an Arduino Mega2560 that runs the network of Xbees and arduinos around the house which so far consists of:

  • Arduino Mega2560 as MotherHub
  • Arduino UNO as data parser from power meter
  • Xbee Co-Ordinator as base unit for Xbee network
  • Outdoor Xbee Temp Sensor that also reports on battery level and solar Voltage
  • CurrentCost Energy Meter measuirng the mains power and outputting to above UNO

Ha. After listing that it doesn’t look like much for the hours of work I’ve poured in. There are also a few projects not completed enough that they are included in the above list:

Arduino UNO Weather unit

  • Wind Speed
  • Wind Direction
  • Rain Gauge
  • Temperature

This one is a little cheaty as it incorporates some Sparkfun parts. The wind and rain sensor are here and a convenient Ardy shield with some nice code on Github are here. To finish this I need to:

  • Xbee hooked up and coded
  • Power requirements calculated to run from solar and a battery
  • Housing designed and printed/built

Arduino House Foyer Sensor Node 

This is all Bread boarded up and tested. It includes:

  • 2 temperature sensors to monitor the hot water cylinder.
  • Room temp and humidity Sensors
  • Light Sensor
  • Motion Sensor

For completion it needs:

  • PCB to be designed and built
  • An enclosure

Arduino Power Monitor Node
This is to replace my CurrentCost device. It has served really well but since adding Solar to the house I need MOAR(tm) control. I currently monitor total power use and the HydroHeat circuits. The new unit will be capable of monitoring 4 circuits. Solar, power and lights, Hydroheat and Total Power consumption. As this sits by the front door it will also need to act as a doorbell, Light sensor, motion sensor and also temperature while communicating wirelessly to MotherHub through an xbee! A busy unit.

Things left to do:

  • Finish circuit board design
  • Enclosure
  • Arduino Code

Data Logging to MySQL and Web Frontend
Motherhub currently logs to Xively here. I want more control of the data and unlimited logging of that data over time which I haven’t seen offered by anyone else yet(for free). I’m sending data from MotherHub to a Python Script running on a Raspberry Pi at the moment. My NAS has an instance of MYSQL running so I log the data there. I could run python on the NAS or even my linux proxy server so save one device and its power consumption (not that the Pi uses much) but future wise I may move all of the sensor processing to the python script and more powerful Pi. Depends how MotherHub can handle 10-20 Xbees sending in packets and all the sensor processing 🙂 I’ve just made good progress on this by getting data into the database. No doubt I have a lot more time to be spent here.

  • Testing Script robustness when accepting data over serial from MotherHub
  • Running script as daemon on the Pi
  • PHP Front end to display graphs

Learning all this as I go but really starting to have fun with it. PCB design and Python being the latest skills I’ve started learning and have to admit enjoying immensely.

This is a great start to Documenting this whole thing! I have more of a plan after putting this to a post. I will do separate posts dealing individually with the different nodes that will include all the finer details of PCB designs and code. I know I said there would be pictures at the top of this post but i think its long enough already. I will add them in to the detailed posts of each arm of the project.If you have read all this then hopefully future posts can help you achieve your own SensorNet 2000 😛 I want to hear about it!

Posted in Arduino, Electronics, Raspberry Pi, SensorNet | Tagged , , , , , | Leave a comment