Reading a Serial output from Arduino with Python V1

This is my first try at Python. It reads the Serial Output from Serial 3 on MotherHub. I had some problems with it randomly throwing exceptions, I seemed to have solved that with some If statements that count the amount of variables. The next 24 hours will be the big test as I just set the script up as a service for uninterrupted SQL insertions 🙂 I’m sure this script will expand over the coming months.

import serial
import MySQLdb
import datetime
from time import sleep
 
ser = serial.Serial('/dev/ttyAMA0', 9600, timeout=0) # This is using the serial GPIO pins on the Raspberry Pi, Pins 14 and 15
conn = MySQLdb.connect( host='Your MySQL server IP', db='SensorDB', user='SensorDBUser', passwd='SensorDBPass' ) #Change these to suit
cursor = conn.cursor()
count = 0
 
while True:
 data = ser.read(9999).strip("\r\n")
 parsed = data.split(",")
 sleep(0.5)
 if len(data) >= 54:
 print 'Serial Packet Length:', len(data)
 print 'Got:', data
 print 'parsed:', parsed
 templist = data.split(',')
 print 'Length:', len(templist)
# print templist
 if len(templist) < 12: #If there arent 12 items parsed from the Arduino output string then somethings not right, Go to Jail. Do not pass Go
 print 'ERROR! BZZZZZZZZZ!'
 continue
 else:
 print 'templist[0]:', templist[0]
 print 'templist[1]:', templist[1]
 print 'templist[2]:', templist[2]
 print 'templist[3]:', templist[3]
 print 'templist[4]:', templist[4]
 print 'templist[5]:', templist[5]
 print 'templist[6]:', templist[6]
 print 'templist[7]:', templist[7]
 print 'templist[8]:', templist[8]
 print 'templist[9]:', templist[9]
 print 'templist[10]:', templist[10]
 print 'templist[11]:', templist[11]
 
 # Prepare SQL query to INSERT a record into the database.
 sql = "INSERT INTO tblSensorData(fldCommsMotion, fldCommsTemp, fldCommsBarometer, fldCommsHumidity, fldCommsLux, fldXbee1Temp, fldXbee1Volt, fldXbee1Battery, fldXbee1SolarV, fldTotalPowerUse, fl dHeatuse, fldLightPower) \
 VALUES ('%s', '%s', '%s', '%s', '%s', '%s', '%s', '%s', '%s', '%s', '%s', '%s' )" % \
 (templist[0], templist[1], templist[2], templist[3], templist[4], templist[5], templist[6], templist[7], templist[8], templist[9], templist[10], templist[11])
 print"sql ready for execution"
  # Execute the SQL command
 cursor.execute(sql)
 print"SQL Injected!"
 count = count + 1
 print 'SQL Update Count:', count #This is just so I can easily see how many updates have processed before an exception
# Commit your changes in the database
 conn.commit()
 
#sleep(1)
print 'not blocked'
 
conn.close()
ser.close()

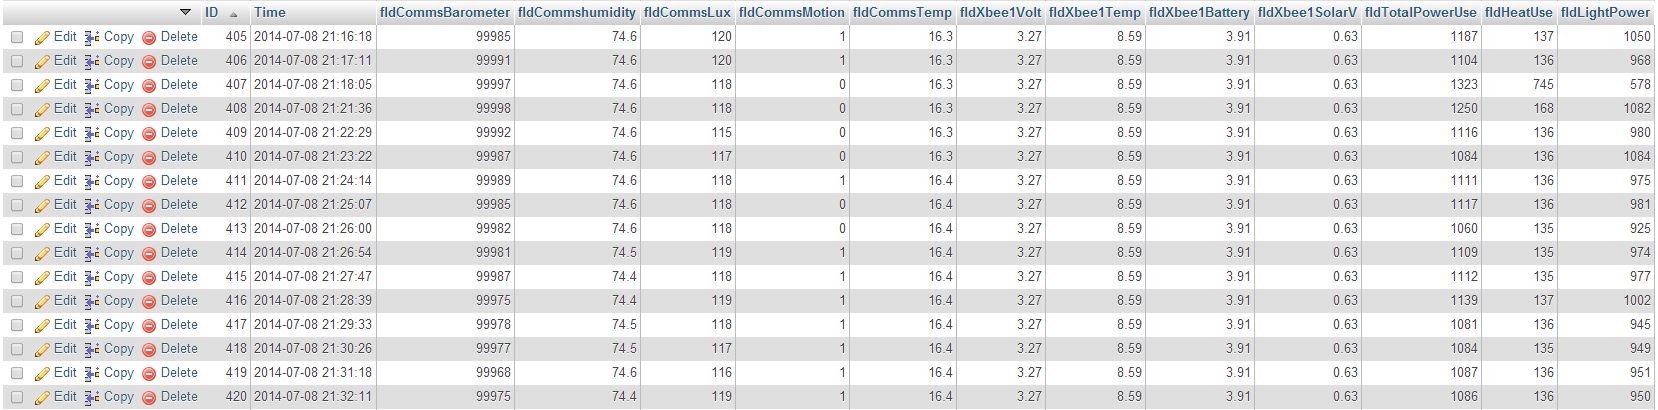
MySQL Data is logging! This is massive motivation to get more sensors online. Even though I don’t have a frontend yet I know the data is there to play with.

SQLData


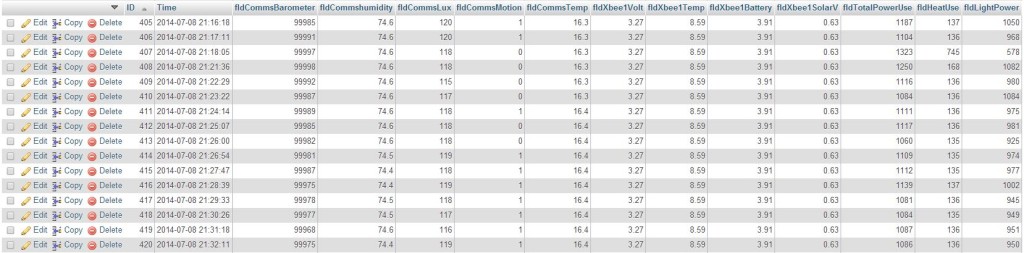
In my travels with PHPMyAdmin I just noticed it has some basic graphing function! Amazing! When did they add that? Now I’ve noticed a problem with the power records


PHPMyADmin graph
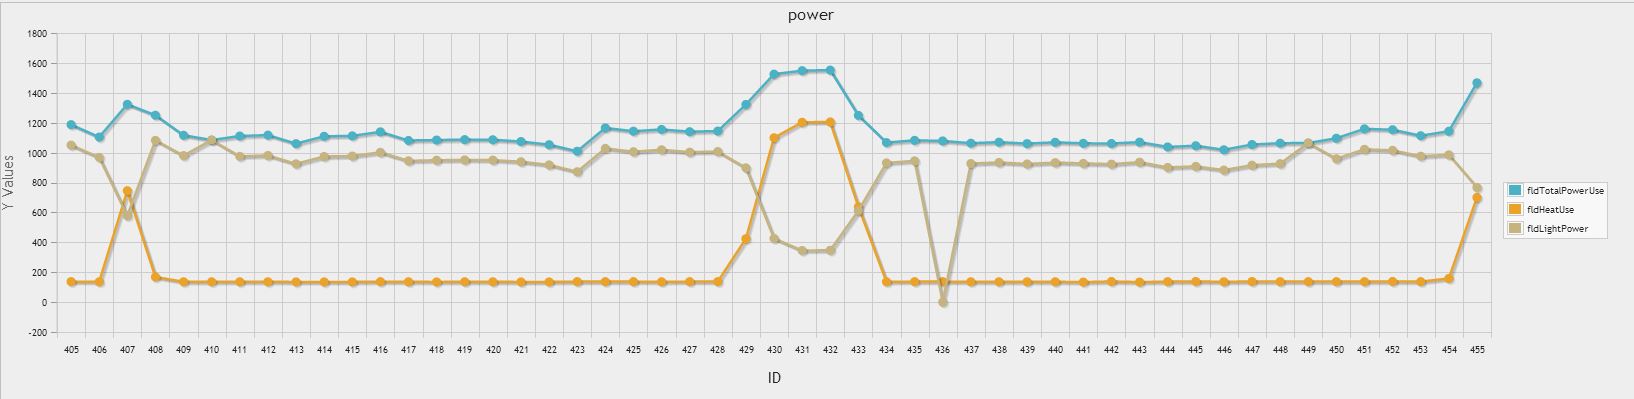
I have 2 sensors monitoring Power. One on the mains for the entire house and one on the Heating Circuit which does the hot water cylinder at the Heat pump. To calculate the lights and power circuit I simply minus the Heating circuit off the total power circuit. The graph however is showing that every time the heater comes on the power use for the house drops considerably. This is not correct. The difference between the Heating consumption and the total should always be consistent. I’m tempted to look further into this but at the same time I could put those efforts into completing my new energy monitor. I’ll think on it awhile and see if something comes to me


Posted in Arduino, Computing, Electronics, MySQL, phpMyAdmin, Python, Raspberry Pi, SensorNet | Tagged , , , , , | Leave a comment

Run Python code as a service

Testing of my python script that reads the serial output from MotherHub seems stable enough to run fulltime now. What I’ve found is though that everytime I turn my PC off my SSH session will time out and kill the python script from running. What I need is a way to run it all the time and auto start it after a reboot. Peiter Vanos has just the thing! I am reposting here for my own reference later. You can find the original code at http://www.pietervanos.net

1. place your python script in the following folder: /usr/local/sbin/ (This can be anywhere you like)
2. create a new file in /etc/init.d/ in this case it will be example, so sudo nano /etc/init.d/example
3. Use the following code for the example file

#! /bin/sh
# /etc/init.d/example
 
case "$1" in
start)
echo "Starting example"
# run application you want to start
python /usr/local/sbin/example.py &
;;
stop)
echo "Stopping example"
# kill application you want to stop
killall python
;;
*)
echo "Usage: /etc/init.d/example{start|stop}"
exit 1
;;
esac
 
exit 0

4. give the file execute rights, sudo chmod 755 example
5. now execute: sudo update-rc.d example defaults

When you reboot raspbian it should automatically start the python script, else try service example start and service example stop


This worked like a charm for me. I could see SQL entries within a minute! Now to see if it can run 24/7 with no problems

Posted in Linux, Python, Raspberry Pi, SensorNet | Tagged , , | 1 Comment

Home SensorNet Overview

I have an ongoing project that involves my house and sensors. I’ve been working on and off on this as enthusiasm warrants but failing to actually post anything about it on dangertech. So this is it, I’m going to give a general overview interspersed with pictures as a starting point and see what happens. I plan on sensoring the shit out of my home. Sensors in every room that include at a bare minimum Temperature, motion and light levels. There are many more add-ons I want to achieve including Oven temperatures, Freezer temp, Water flow etc etc etc etc. I love stats and cant get enough.

SensorNet aka. Motherhub is an Arduino Mega2560 that runs the network of Xbees and arduinos around the house which so far consists of:

  • Arduino Mega2560 as MotherHub
  • Arduino UNO as data parser from power meter
  • Xbee Co-Ordinator as base unit for Xbee network
  • Outdoor Xbee Temp Sensor that also reports on battery level and solar Voltage
  • CurrentCost Energy Meter measuirng the mains power and outputting to above UNO

Ha. After listing that it doesn’t look like much for the hours of work I’ve poured in. There are also a few projects not completed enough that they are included in the above list:

Arduino UNO Weather unit

  • Wind Speed
  • Wind Direction
  • Rain Gauge
  • Temperature

This one is a little cheaty as it incorporates some Sparkfun parts. The wind and rain sensor are here and a convenient Ardy shield with some nice code on Github are here. To finish this I need to:

  • Xbee hooked up and coded
  • Power requirements calculated to run from solar and a battery
  • Housing designed and printed/built

Arduino House Foyer Sensor Node 

This is all Bread boarded up and tested. It includes:

  • 2 temperature sensors to monitor the hot water cylinder.
  • Room temp and humidity Sensors
  • Light Sensor
  • Motion Sensor

For completion it needs:

  • PCB to be designed and built
  • An enclosure

Arduino Power Monitor Node
This is to replace my CurrentCost device. It has served really well but since adding Solar to the house I need MOAR(tm) control. I currently monitor total power use and the HydroHeat circuits. The new unit will be capable of monitoring 4 circuits. Solar, power and lights, Hydroheat and Total Power consumption. As this sits by the front door it will also need to act as a doorbell, Light sensor, motion sensor and also temperature while communicating wirelessly to MotherHub through an xbee! A busy unit.

Things left to do:

  • Finish circuit board design
  • Enclosure
  • Arduino Code

Data Logging to MySQL and Web Frontend
Motherhub currently logs to Xively here. I want more control of the data and unlimited logging of that data over time which I haven’t seen offered by anyone else yet(for free). I’m sending data from MotherHub to a Python Script running on a Raspberry Pi at the moment. My NAS has an instance of MYSQL running so I log the data there. I could run python on the NAS or even my linux proxy server so save one device and its power consumption (not that the Pi uses much) but future wise I may move all of the sensor processing to the python script and more powerful Pi. Depends how MotherHub can handle 10-20 Xbees sending in packets and all the sensor processing 🙂 I’ve just made good progress on this by getting data into the database. No doubt I have a lot more time to be spent here.

  • Testing Script robustness when accepting data over serial from MotherHub
  • Running script as daemon on the Pi
  • PHP Front end to display graphs

Learning all this as I go but really starting to have fun with it. PCB design and Python being the latest skills I’ve started learning and have to admit enjoying immensely.

This is a great start to Documenting this whole thing! I have more of a plan after putting this to a post. I will do separate posts dealing individually with the different nodes that will include all the finer details of PCB designs and code. I know I said there would be pictures at the top of this post but i think its long enough already. I will add them in to the detailed posts of each arm of the project.If you have read all this then hopefully future posts can help you achieve your own SensorNet 2000 😛 I want to hear about it!

Posted in Arduino, Electronics, Raspberry Pi, SensorNet | Tagged , , , , , | Leave a comment

Kill it Now Patch Cabling! Part 2

It’s 11 Months on since the last photo and at least it looks better! Still a ways to go 🙂

patching pt2


Old shot, May 2013.

stuff 002

Posted in Computing, Networking | Tagged , , , | Leave a comment

none/417 4705 Squid Proxy Error

Maybe You can see a 4705 error or somewhat in your squid logs?

I just had a problem where Guncraft would tell me that it could not sync with steam and could only play in offline mode. But wait a minute… my friends can play! Sure enough a weird line in the proxy logs!  This is a Squid3 issue but we can fix it.

Fix:

Add the line: 

ignore_expect_100 on

to your /etc/squid3/squid.conf file


Other apps that can have this problem:

AppBrain
Facebook Contact Sync
BOINC

Posted in Linux | Tagged , , , , , , | Leave a comment

Looking for Wasted HD Space on the Raspberry Pi

Twice now I’ve ran out of space on my Raspberry Pi. First time I freed up some space and the second time that happened not to long after I went looking for the problem. This is how I found it…

danger@dangerpi ~ df -h
Filesystem      Size  Used Avail Use% Mounted on
rootfs          3.7G  2.9G  643M  82% /
/dev/root       3.7G  2.9G  643M  82% /
devtmpfs        180M     0  180M   0% /dev
tmpfs            38M  1.3M   37M   4% /run
tmpfs           5.0M     0  5.0M   0% /run/lock
tmpfs            75M     0   75M   0% /run/shm
/dev/mmcblk0p1   56M   20M   37M  35% /boot
tmpfs            75M     0   75M   0% /tmp
/dev/sda1       925G  898G   27G  98% /mnt/DangerDrive

rootfs and /dev/root are the same thing in this case, the RPis SDCard. The above is after I found the culprit and cleaned it out. Now lets drill into it a little more

danger@dangerpi / $ sudo du -sh *
5.2M    bin
19M     boot
0       dev
4.8M    etc
3.3M    home
50M     lib
16K     lost+found
4.0K    media
898G    mnt
36M     opt
du: cannot access `proc/12707/task/12707/fd/4': No such file or directory
du: cannot access `proc/12707/task/12707/fdinfo/4': No such file or directory
0       proc
28K     root
1.3M    run
5.9M    sbin
4.0K    selinux
4.0K    srv
0       sys
0       tmp
1.3G    usr
661M    var

Aha! We can see which folders take up all the space!

danger@dangerpi /var/log $ sudo du -sh *
0       alternatives.log
4.0K    alternatives.log.1
4.0K    alternatives.log.2.gz
4.0K    alternatives.log.3.gz
4.0K    alternatives.log.4.gz
173M    syslog.1
0       syslog.1.gz
940K    syslog.2.gz
904K    syslog.3.gz
4.0K    user.log.4.gz
8.0K    wtmp
220K    wtmp.1
12K     Xorg.0.log

I’ve cut this down a a little but look at that syslog file! Perty big for a log file. What was happening once I had a look at it was transmission which runs on this particular Pi was spamming errors about not being able to find some files. I deleted the logs taking up all the space with

sudo rm -f syslog.*

and then removed the offending files from transmission. Hopefully this proves to be the root of the problems.

Posted in Computing, Linux, Raspberry Pi | Tagged , , | 1 Comment

Transparent Squid3 Proxy Setup

You probably don’t really need a caching proxy on your home network but hey, why the hell not. You can pull some decent stats out of it over time. Most popular sites, biggest net users etc. etc. I have to admit to loving stats…. and graphs. I’m not sure of the appeal, I just like to see them. One of my all encompassing projects is to setup a sensor network around the house reporting into a MYSQL  back-end with a PHP front end serving up the graph love. But I digress! Lets setup Squid3!

This is what we need:
Spare PC
2 Network ports
Spare time

Home_Proxy


The great thing about making the Proxy transparent is there is no need to configure any browser settings! You simply send all your network traffic over the interface bridge on your proxy box and then magic kicks in! First thing we should do is get get Linux. Steep learning curve. Frustrating as hell when it doesn’t work but perseverance pays off and you will be a better person in the end. For this particular build I used Ubuntu 12.04. Once you have the image you can burn it to disk or whack it on a key. Who the hell burns DVD’s these days? Do your self a good one and chuck it on a key. There are some really great apps that can build a bootable key for you and they are free. You just point them at the ISO and away you go. I’m going to skip over the pretty standard stuff like installing Ubuntu but if you need help drop a comment and I’ll see what I can do.

So you are now looking at your new Ubuntu Desktop, Mmmm Juicy! Press the windows key and type it terminal…. now click the terminal icon. Bam! This is where we live. Make a shortcut for it on the desktop or wherever you like and fire it up.

Lets get the new install up to date

sudo apt-get update
sudo apt-get upgrade

Now lets install the stuff we will need

sudo apt-get install squid3 bridge-utils ebtables

Now we will setup Squid

sudo nano /etc/squid3/squid.conf

Change/add the appropriate lines to the below

http_port 3128 transparent
acl localnet src <strong>192.168.0.0</strong>/24
acl localhost src 127.0.0.1/255.255.255.255
http_access allow localnet
http_access allow localhost
cache_dir ufs /var/spool/squid3 5000 16 256

Please take note of the bolded IP address. Change this to suit your home network setup. Say your computer IP is 172.16.0.10… You would update the above to 172.16.0.0/24. Press Ctrl-X, answer yes to keep changes and press enter to overwrite the current file. Now we will restart squid….

sudo /etc/init.d/squid3 restart

Now we can configure the network to pass all the data from one ethernet card to the other while redirecting port 80 (http) to port 3128(Proxy) before sending on to the interwebs.

sudo ebtables -t broute -A BROUTING -p IPv4 --ip-protocol 6 --ip-destination-port 80 -j redirect --redirect-target ACCEPT
sudo iptables -t nat -A PREROUTING -i br0 -p tcp --dport 80 -j REDIRECT --to-port 3128

We also need to enable traffic to be passed through for both IPv4 and IPv6 on your proxy PC by uncommenting the following lines in sysctl.conf.

sudo nano /etc/sysctl.conf
(remove the # to uncomment these lines)
net.ipv4.ip_forward=1
net.ipv6.conf.all.forwarding=1

Now to the NIC configs!

sudo nano /etc/network/interfaces
auto lo
iface lo inet loopback
auto eth1
iface eth1 inet static
address 192.168.0.3
netmask 255.255.255.0
network 192.168.2.0
broadcast 192.168.2.255
 
auto br0
iface br0 inet static
address 192.168.0.2
netmask 255.255.255.0
network 192.168.2.0
broadcast 192.168.2.255
gateway 192.168.2.1
bridge-ports eth0 eth1

Save the file and either reboot the system or just the services with:

sudo /etc/init.d/networking restart
sudo service squid3 restart

This is a good time to make sure you disconnect the cable between your router and switch. As in the top diagram you should have Router –> br01 eth1 –> Switch

Jump on the net from another pc and browse some pictures of cats. Bounce back to your proxy terminal and….

sudo tail /var/log/squid3/access.log -f

This is the live Proxy log of everything hitting your proxy. Sweet huh? Its interesting just to watch what actually goes out of your network. You may feel your eyes drawn to the screen for awhile just to watch. Maybe that’s just me though 🙂 That wasn’t so hard! All going well you’re seeing some impressive shit. All not going well you are cursing and wondering what the hell to do now. I had such problems so lets go over them. Due to me deciding to re-organize my network IPs my proxy box didnt get a DNS server to use.

sudo nano /etc/resolv.conf
nameserver <strong>192.168.0.1</strong>(Your router or DNS server)
nameserver 8.8.8.8(Secondary google open DNS server)

That fixed DNS.

The other problem I had was having 2 gateways set in /etc/network/interfaces. One for each NIC. This caused two default IP routes and basically screwed me and the network for hours! You will see a rtnetlink error when trying to bring up the network interfaces if you are having much the same thing.

As I hopefully remembered to mention at the start of this post, You dont need to actually change anything on your local computers to have the traffic flow through your proxy. Wireless devices however are a little harder to deal with. The simple way is to just enter the proxy details manually on these devices. Those details being the IP of your proxy bridge interface(192.168.0.2) and the port (3128).


Posted in Linux, Networking | Tagged , , , , , , , , , , , | 6 Comments

Kill It NOW Patch Cabling!


Opposing the sexy patch cabling from last month here we have the opposite! While certainly having more character it just doesn’t have the sexy. Three IT Trainees have been found dead in this nest of Cable madness! Very limited cable management can help cabling get like this. On the flip side it can get MUCH worse than this 🙂stuff 002

Posted in Computing, Networking | Tagged , , , | Leave a comment

Sexy Sexy Patch Cabling

It’s always a pleasure to see a good patch job.

Also first post to the blog from my iPhone. Will try from the Nexus 10 next time, should be better!

20130422-191745.jpg

20130422-191801.jpg

Posted in Networking | Tagged , , , | 2 Comments