You probably don’t really need a caching proxy on your home network but hey, why the hell not. You can pull some decent stats out of it over time. Most popular sites, biggest net users etc. etc. I have to admit to loving stats…. and graphs. I’m not sure of the appeal, I just like to see them. One of my all encompassing projects is to setup a sensor network around the house reporting into a MYSQL back-end with a PHP front end serving up the graph love. But I digress! Lets setup Squid3!
This is what we need:
Spare PC
2 Network ports
Spare time
The great thing about making the Proxy transparent is there is no need to configure any browser settings! You simply send all your network traffic over the interface bridge on your proxy box and then magic kicks in! First thing we should do is get get Linux. Steep learning curve. Frustrating as hell when it doesn’t work but perseverance pays off and you will be a better person in the end. For this particular build I used Ubuntu 12.04. Once you have the image you can burn it to disk or whack it on a key. Who the hell burns DVD’s these days? Do your self a good one and chuck it on a key. There are some really great apps that can build a bootable key for you and they are free. You just point them at the ISO and away you go. I’m going to skip over the pretty standard stuff like installing Ubuntu but if you need help drop a comment and I’ll see what I can do.
So you are now looking at your new Ubuntu Desktop, Mmmm Juicy! Press the windows key and type it terminal…. now click the terminal icon. Bam! This is where we live. Make a shortcut for it on the desktop or wherever you like and fire it up.
Lets get the new install up to date
sudo apt-get update
sudo apt-get upgrade |
sudo apt-get update
sudo apt-get upgrade
Now lets install the stuff we will need
sudo apt-get install squid3 bridge-utils ebtables |
sudo apt-get install squid3 bridge-utils ebtables
Now we will setup Squid
sudo nano /etc/squid3/squid.conf |
sudo nano /etc/squid3/squid.conf
Change/add the appropriate lines to the below
http_port 3128 transparent
acl localnet src <strong>192.168.0.0</strong>/24
acl localhost src 127.0.0.1/255.255.255.255
http_access allow localnet
http_access allow localhost
cache_dir ufs /var/spool/squid3 5000 16 256 |
http_port 3128 transparent
acl localnet src <strong>192.168.0.0</strong>/24
acl localhost src 127.0.0.1/255.255.255.255
http_access allow localnet
http_access allow localhost
cache_dir ufs /var/spool/squid3 5000 16 256
Please take note of the bolded IP address. Change this to suit your home network setup. Say your computer IP is 172.16.0.10… You would update the above to 172.16.0.0/24. Press Ctrl-X, answer yes to keep changes and press enter to overwrite the current file. Now we will restart squid….
sudo /etc/init.d/squid3 restart |
sudo /etc/init.d/squid3 restart
Now we can configure the network to pass all the data from one ethernet card to the other while redirecting port 80 (http) to port 3128(Proxy) before sending on to the interwebs.
sudo ebtables -t broute -A BROUTING -p IPv4 --ip-protocol 6 --ip-destination-port 80 -j redirect --redirect-target ACCEPT
sudo iptables -t nat -A PREROUTING -i br0 -p tcp --dport 80 -j REDIRECT --to-port 3128 |
sudo ebtables -t broute -A BROUTING -p IPv4 --ip-protocol 6 --ip-destination-port 80 -j redirect --redirect-target ACCEPT
sudo iptables -t nat -A PREROUTING -i br0 -p tcp --dport 80 -j REDIRECT --to-port 3128
We also need to enable traffic to be passed through for both IPv4 and IPv6 on your proxy PC by uncommenting the following lines in sysctl.conf.
sudo nano /etc/sysctl.conf |
sudo nano /etc/sysctl.conf
(remove the # to uncomment these lines)
net.ipv4.ip_forward=1
net.ipv6.conf.all.forwarding=1 |
(remove the # to uncomment these lines)
net.ipv4.ip_forward=1
net.ipv6.conf.all.forwarding=1
Now to the NIC configs!
sudo nano /etc/network/interfaces |
sudo nano /etc/network/interfaces
auto lo
iface lo inet loopback
auto eth1
iface eth1 inet static
address 192.168.0.3
netmask 255.255.255.0
network 192.168.2.0
broadcast 192.168.2.255

auto br0
iface br0 inet static
address 192.168.0.2
netmask 255.255.255.0
network 192.168.2.0
broadcast 192.168.2.255
gateway 192.168.2.1
bridge-ports eth0 eth1 |
auto lo
iface lo inet loopback
auto eth1
iface eth1 inet static
address 192.168.0.3
netmask 255.255.255.0
network 192.168.2.0
broadcast 192.168.2.255
auto br0
iface br0 inet static
address 192.168.0.2
netmask 255.255.255.0
network 192.168.2.0
broadcast 192.168.2.255
gateway 192.168.2.1
bridge-ports eth0 eth1
Save the file and either reboot the system or just the services with:
sudo /etc/init.d/networking restart
sudo service squid3 restart |
sudo /etc/init.d/networking restart
sudo service squid3 restart
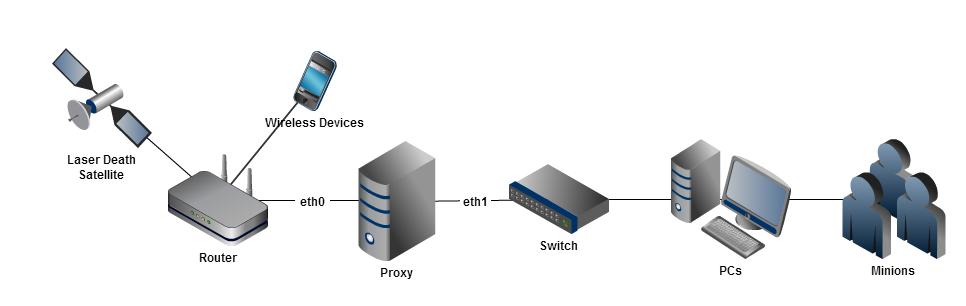
This is a good time to make sure you disconnect the cable between your router and switch. As in the top diagram you should have Router –> br01 eth1 –> Switch
Jump on the net from another pc and browse some pictures of cats. Bounce back to your proxy terminal and….
sudo tail /var/log/squid3/access.log -f |
sudo tail /var/log/squid3/access.log -f
This is the live Proxy log of everything hitting your proxy. Sweet huh? Its interesting just to watch what actually goes out of your network. You may feel your eyes drawn to the screen for awhile just to watch. Maybe that’s just me though 🙂 That wasn’t so hard! All going well you’re seeing some impressive shit. All not going well you are cursing and wondering what the hell to do now. I had such problems so lets go over them. Due to me deciding to re-organize my network IPs my proxy box didnt get a DNS server to use.
sudo nano /etc/resolv.conf |
sudo nano /etc/resolv.conf
nameserver <strong>192.168.0.1</strong>(Your router or DNS server)
nameserver 8.8.8.8(Secondary google open DNS server) |
nameserver <strong>192.168.0.1</strong>(Your router or DNS server)
nameserver 8.8.8.8(Secondary google open DNS server)
That fixed DNS.
The other problem I had was having 2 gateways set in /etc/network/interfaces. One for each NIC. This caused two default IP routes and basically screwed me and the network for hours! You will see a rtnetlink error when trying to bring up the network interfaces if you are having much the same thing.
As I hopefully remembered to mention at the start of this post, You dont need to actually change anything on your local computers to have the traffic flow through your proxy. Wireless devices however are a little harder to deal with. The simple way is to just enter the proxy details manually on these devices. Those details being the IP of your proxy bridge interface(192.168.0.2) and the port (3128).